
Sweet Dahlia Crochet Bag
This post may contain referral/affiliate links. Please read my disclosure for more info.
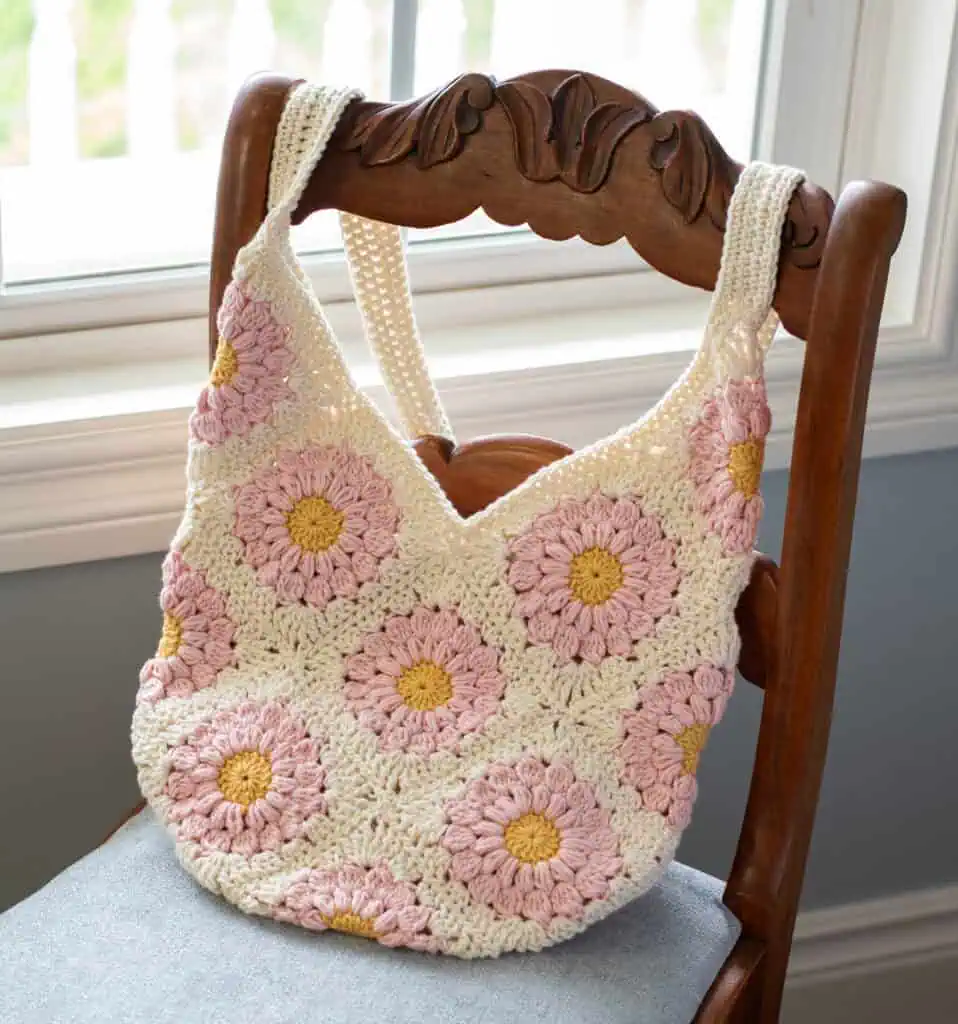
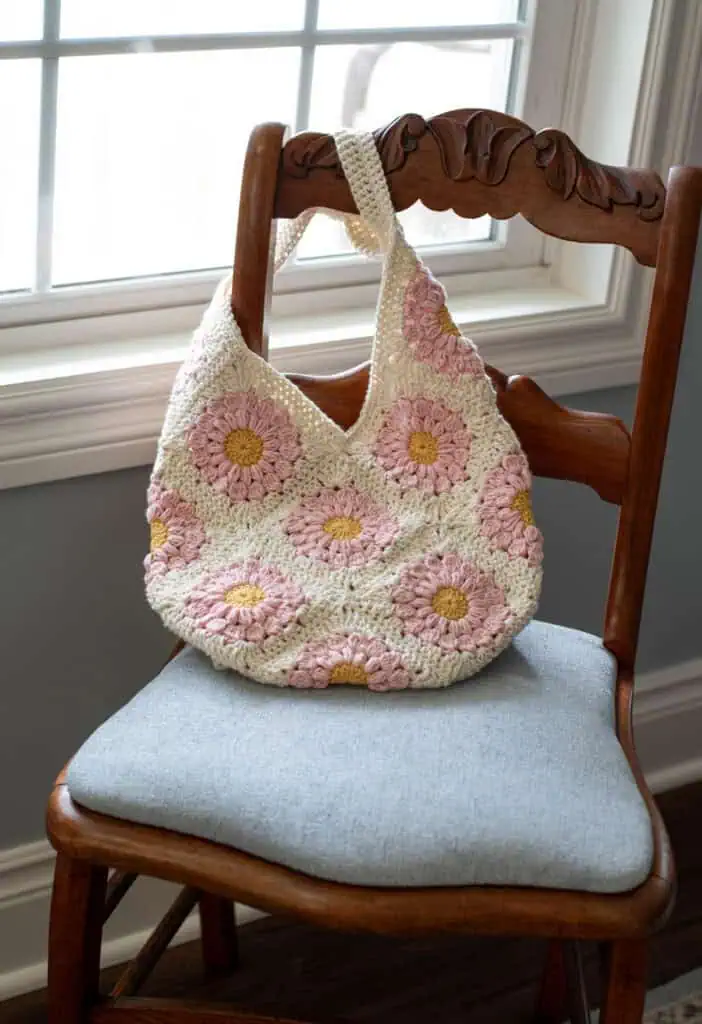
Oh be still my little summer heart because this sweet crochet bag has swept me away. I’m all in love with the soft pretty colors in this beautiful crochet granny square bag.
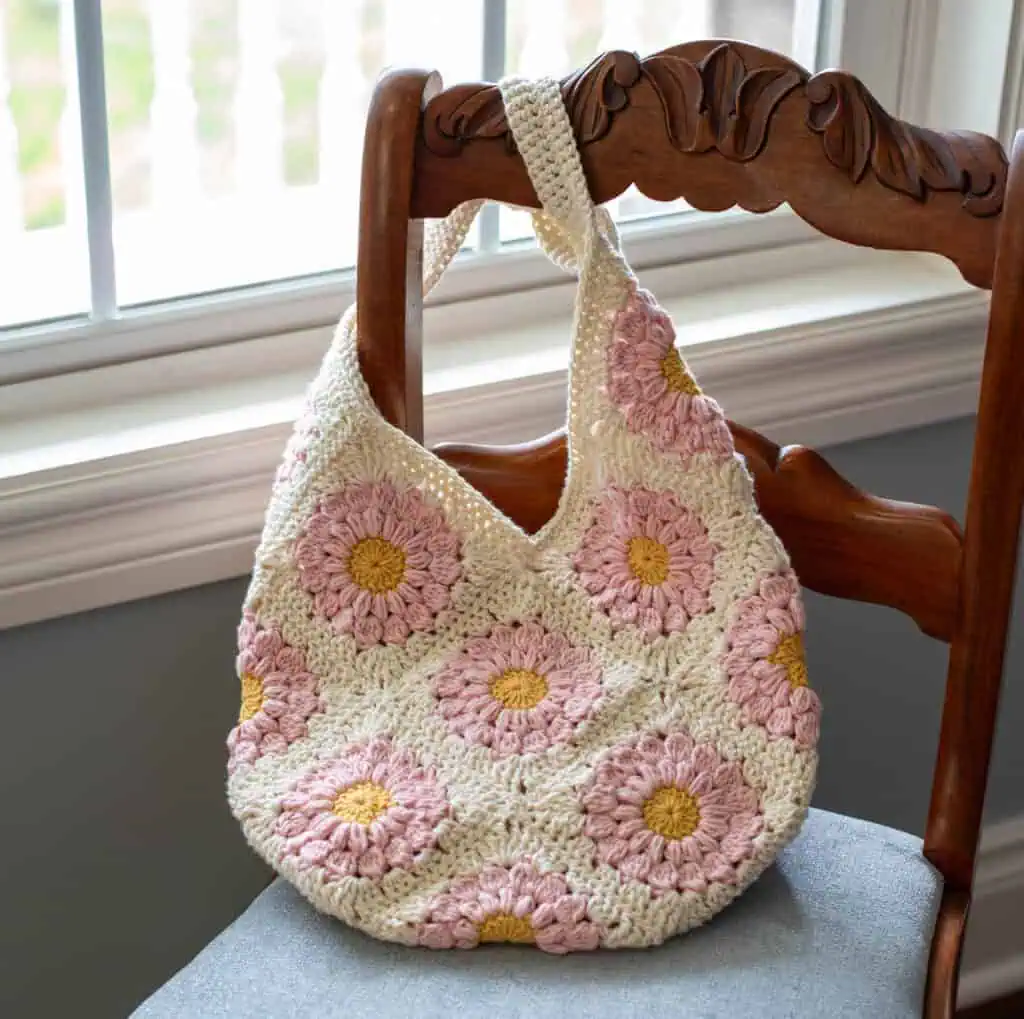
Just when I thought I couldn’t love the sunburst granny square any more, this beauty walked into my life. Just how.. how is it that this easy to make flower granny square can turn into so many beautiful things?
Sigh.
And now.. meet my new all time favorite.. the Sweet Dahlia Bag!
For my super observant readers, you’re probably thinking.. ‘wow.. this looks suspiciously like that fabulous Sweet Summer SUNFLOWER bag‘. And yes, yes, you would be right. But the Sweet Dahlia has some key differences.
First up, you’re going to be crocheting two extra squares, for a total of 15 squares. Those 2 squares go at the top of each side, which enables us to make one long strap instead of two.
I’m loving that you can custom crochet the to your liking. I’ve got mine at a crossbody length, which is my personal favorite way to wear a bag. But you can crochet your strap a bit shorter for an over the shoulder vibe if you prefer.
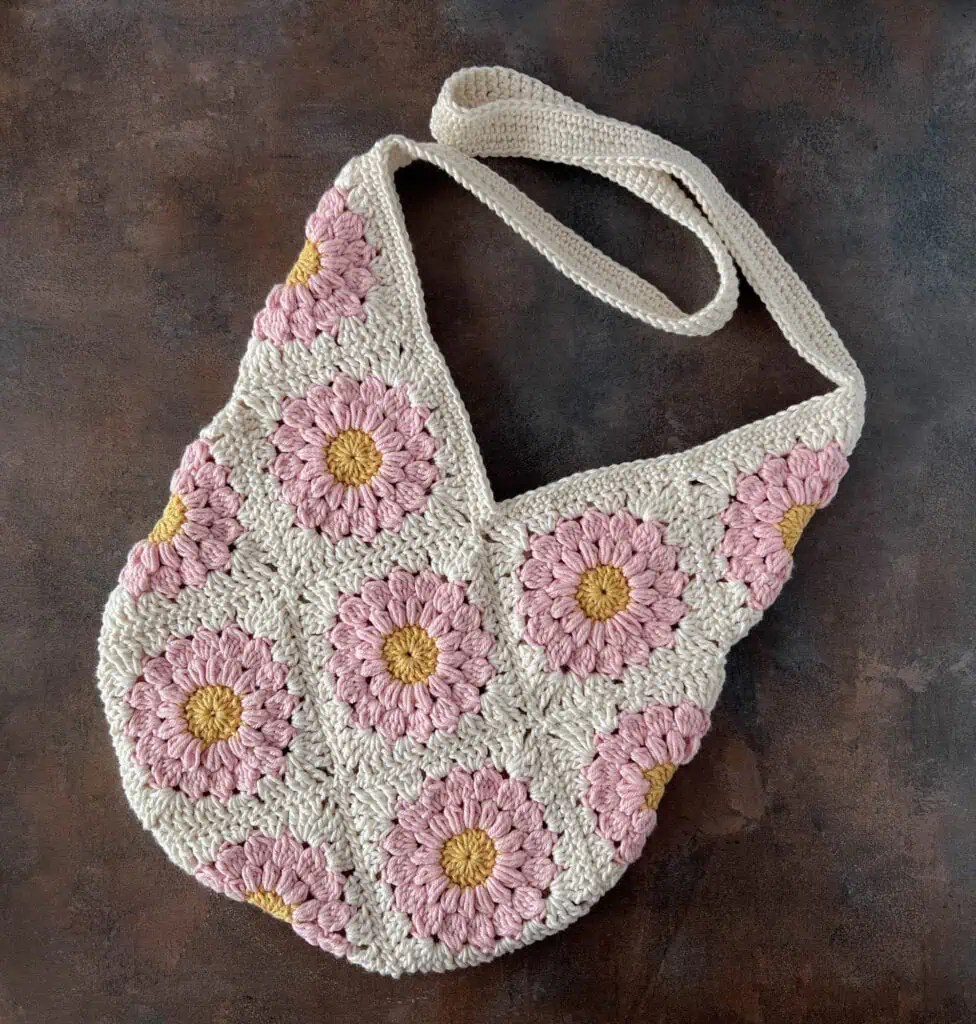
And can we talk about the soft, delectable colors in this bag?
I’m a newcomer to Dishie yarn and I’m all about it. Like I want to crochet every cotton THING with this YARN and abandon all others. Yes, I like it THAT much.
It glides over your hook and the yarn doesn’t have that tendency split like other worsted cotton yarn sometimes does. And the colors are perfection. I can’t decide what I love more.. that soft blush pink, the creme brûlée yellow which is just the perfect shade of soft yellow and the swan color which is not quite white but not too far to the ivory.
I used the same brand of yarn on the Wander Bloom Bag. In fact, the flower on the Wander Bloom Bag uses some leftover yarn from this Sweet Dhalia Bag. (And yes, sometimes I post patterns out of order from how I design them. LOL)
The Dishie Yarn is worth the online order and wait a little for it type of yarn. Such a delight!
Let’s dive into this cute crochet bag pattern.
Sweet Dahlia Crochet Bag
Materials
Here is what you will need:
- US G6/4mm crochet hook (these are my absolute favorite hooks I recommend to everyone!)
- Worsted weight cotton yarn. Sample used We Crochet Dishie in the following colors:
- 220 yards Swan
- 200 yards Blush
- 40 yards Creme Brûlée
- Tapestry needle and scissors
Gauge:
With the yarn and hook size given, each finished sunburst granny square is about 4.25″ x 4.25″. Gauge does not need to be exact.
Resources and tutorials you may find helpful in following this pattern: Crochet Abbreviations, US to UK Crochet Conversion Chart. Find links to stitches on the “Tutorial” menu: Getting Started will show basic stitches used in many patterns and Crochet Stitch Dictionary shows our growing collection of crochet stitch tutorials.
Crochet Abbreviations
- ch = chain
- sc = single crochet
- hdc = half double crochet
- dc = double crochet
- tr = treble crochet
- sl st = slip stitch
- st = stitch(es)
Special Stitches:
Puff Stitch: Yarn over, insert hook into next stitch and pull up a loop to the height of a double crochet (3 loops on hook). Then yarn over again and insert hook into the same stitch and pull up another loop ( 5 loops on hook). Yarn over again, insert hook into the same space and pull up another loop. (7 loops on hook). Pull yarn through all loops. Chain 1 to lock in the stitch.
Bobble Stitch: Yarn over, insert hook into space between 2 puff stitches and pull up a loop. Yarn over and pull through 2 loops (this leaves 2 loops on hook). Make 3 more incomplete double crochet stitches. There are now 5 loops on the hook. Yarn over and pull through all 5 loops. Chain 2 to lock in the bobble stitch. Here’s a detailed bobble stitch tutorial.
Crochet Bag Size
Crochet Dahlia Bag is approximately 12″ wide by 15″ tall (excluding the strap).
Crochet Sunburst Granny Squares (make 15):
Using Crème Brûlée (yellow) color and a G hook, make a magic ring.
R1: Ch 3 (counts as first dc), make 15 dc into the loop. Sl st to top of 1st stitch in the row to join. Fasten off yellow. (16 st)
R2: This row is comprised of puff stitches (described above). First, attach the Blush Pink color in any stitch and chain 2. *Yarn over, insert hook into same stitch as joining and pull up a loop to the height of a double crochet (3 loops on hook). Then yarn over again and insert hook into the same stitch and pull up another loop ( 5 loops on hook). Yarn over again, insert hook into the same space and pull up another loop. (7 loops on hook). Pull yarn through all loops. Chain 1 to lock in the stitch. First puff stitch made.
Make puff stitches in all the stitches in the previous row as follows: Yarn over, insert hook into next stitch and pull up a loop to the height of a double crochet (3 loops on hook). Then yarn over again and insert hook into the same stitch and pull up another loop ( 5 loops on hook). Yarn over again, insert hook into the same space and pull up another loop. (7 loops on hook). Pull yarn through all loops. Chain 1 to lock in the stitch. At end of round, sl st to top of 1st puff stitch. (16 puff stitches).
R3: This row is worked in bobbles (described above). Sl st into next space, then ch 2 (counts as first ‘leg’ of bobble), yarn over, insert hook into space between 2 puff stitches and pull up a loop. Yarn over and pull through 2 loops (this leaves 2 loops on hook). Make 2 more incomplete double crochet stitches. There are now 4 loops on the hook. Yarn over and pull through all 4 loops. Chain 2 to lock in the bobble stitch. First bobble stitch made. Then continue to work bobbles (following the instructions in the special stitches section) across the row into the spaces in the previous row. At end of row, slip stitch to top of 1st bobble stitch. (16 bobble stitches). Fasten off blush yarn.

R4: Join swan color in any space in previous round. Chain 3 (counts as 1st dc). 2 dc in same space. *In next space, work all of the following: (3 tr, ch 2, 3 tr). Corner made. 3 dc in next space, 3 hdc in next space, 3 dc in next space*. Repeat from * 3 more times. Then work 3 dc in next space, 3 hdc in last space and join with a slip st to 1st dc in row. I like to use an invisible join for a nice finish. Alternatively, slip stitch to the top of the 1ststitch. Fasten off yarn and weave in the ends.
Sew Sunburst Squares Together
Time to sew the squares together! Lay squares out in rows according to the diagram below. Whip stitch squares together.
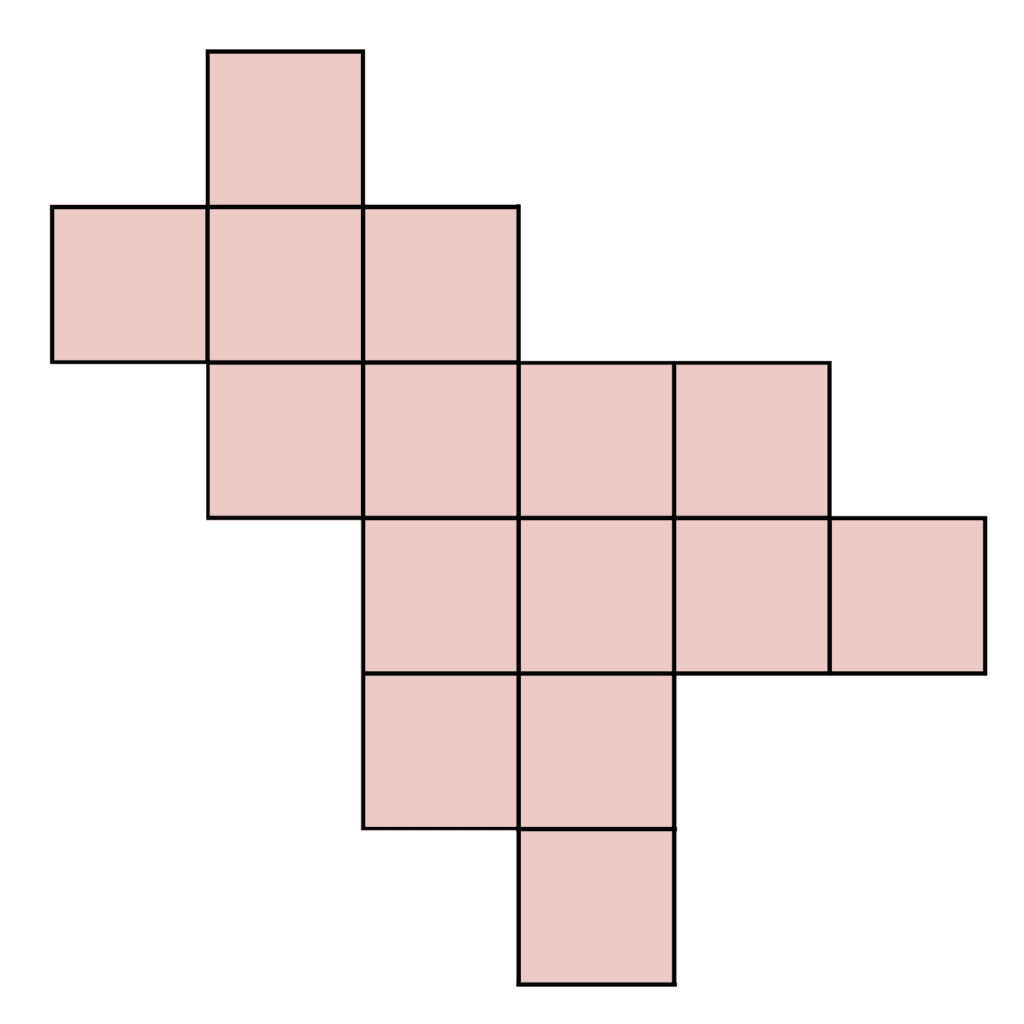
Rotate work so it looks like the below diagram. The dotted line represents the bottom of the bag. Fold on this line.
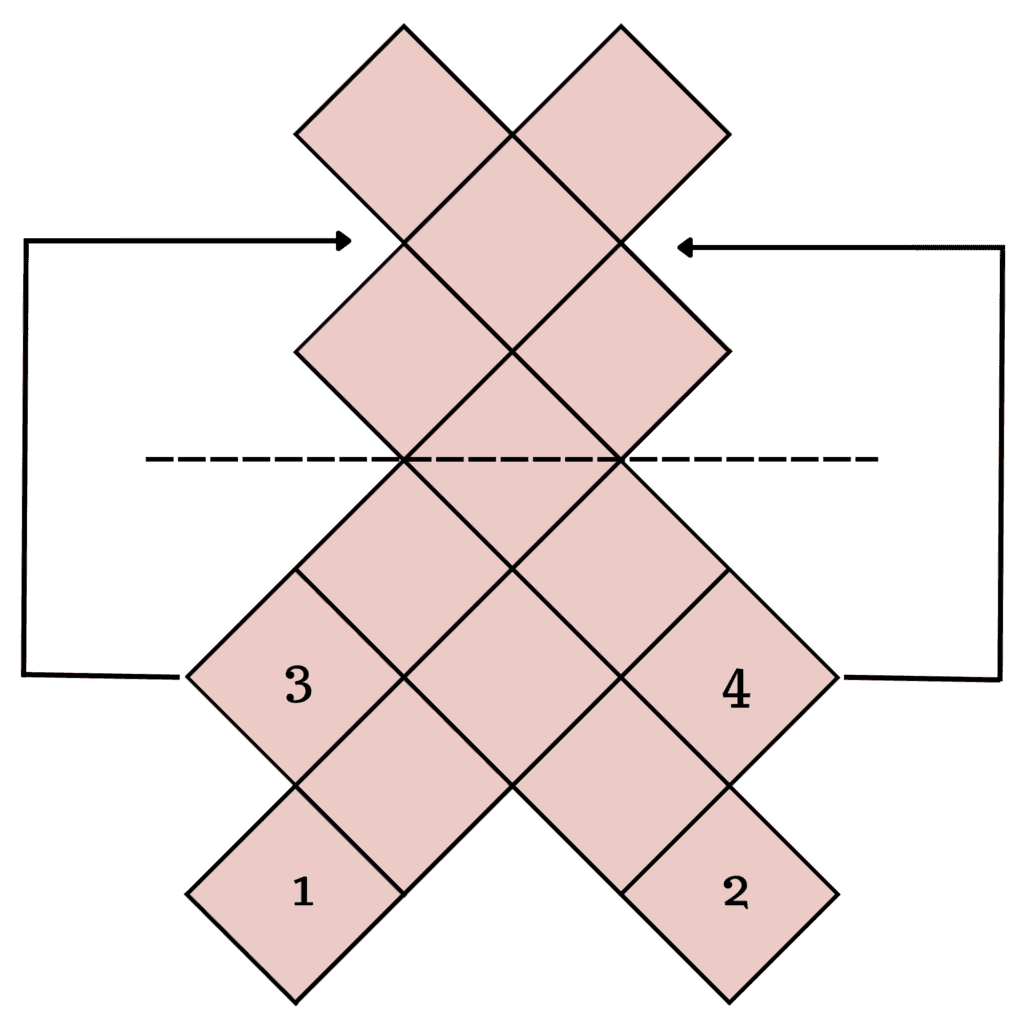
Refer to both the diagram and the below photo as you sew your blocks together.
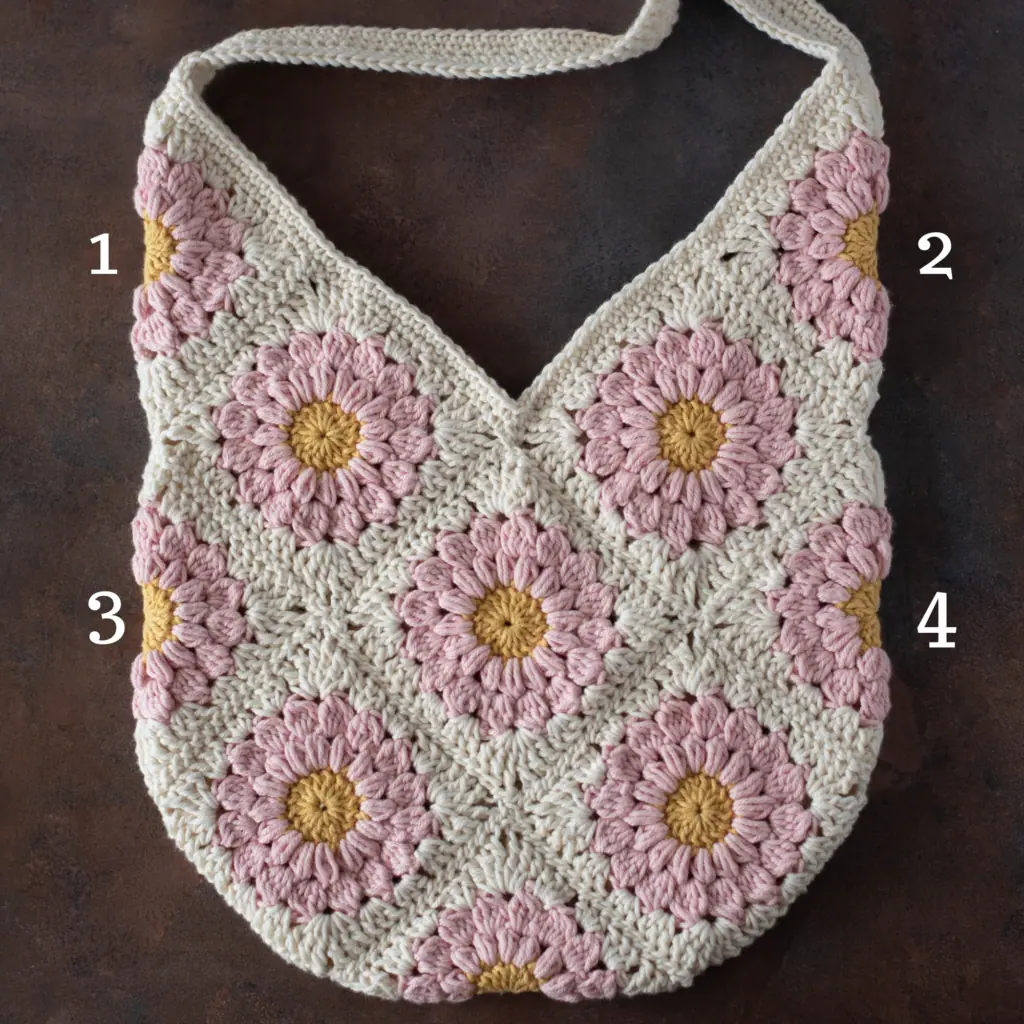
Referring to the numbered blocks on the diagram and the corresponding squares on the photo, fold in the squares that form the sides of the bag and sew those squares to the opposite side (front or back) and continue to sew the squares together that make up the lower sides of the bag. Repeat the process on the opposite side of the bag.
Crochet the Border and Strap
The border and strap are worked at the same time, first by chaining for the strap and working a single crochet border on one side of the bag and strap. Then we fasten off and reattach on the other side of the bag to work the 2nd half of the strap and the border on the other sie of the bag.
It’s important to be a bit flexible when working the border and bag strap. Working across the “V” shape at the center front and back can be especially tricky. What is most important is to keep an eye on this area as well as where the strap joins the bag on either side. If you find your work is not laying flat and is a bit too full, then work an extra decrease in that spot.
Edging Side 1
Join swan color yarn to top of the point at square 2 in the photo above.
R1: ch 120. Making sure not to twist the chain, join this with a sl st into the top point of square 1 in the photo above. Then turn and work a sc in the back bump of the chain across. (If you are unfamiliar with working in the back bump, just work in each chain instead.) Stop after you work a sc in the last chain, but do not fasten off. Try on the bag to make sure you are happy with the length and redo this part if necessary to get the length you prefer.
R2: Work a single crochet in the first double crochet of the bag itself. Then continue to Single crochet around until you come to the strap on the opposite side of the bag. When you come to the center where the joining point forms a little “valley”, single crochet to the last stitch of the square the forms one side of the “valley”, do not work any stitch into the point where the 2 squares join. Then continue working single crochet starting with the 1st stitch of the next square. If this leaves a large “hole”, then simply work a decrease and include the point where the 2 squares join as part of the decrease. Continue to single crochet across the strap until you get to the first stitch in the row. Do not join.
R3: Work a single crochet into each stitch around as in row 2, being mindful of the center front (or back) and decreasing a stitch there if needed so the bag lays flat. Work around the bag and handle until you get to the start of the row, fasten off, using an invisible join for a nice finish. (Alternatively, slip stitch to the top of the 1ststitch. then sl st to the next stitch and fasten off.)
Edging Side 2
Now we’ll work stitches on the opposite side of the bag and on the opposite side of the starting chain on the strap. Using swan color yarn, put a slip knot on your hook and join with a single crochet to the first stitch after the strap on the opposite side of the bag.
R1: Sc around edge of bag, similar to side one, making sure to decrease at the center, if needed, to keep the bag laying nice and flat, continue to sc around the opposite side of the strap to complete the row.
R2: Repeat row one. Work around the bag and handle until you get to the start of the row, then sl st to the next stitch and fasten off. Alternatively, you can use an invisible join to finish the row (which is my preference).
Weave in any ends.
The Sweet Dahlia Crochet bag is unlined. However, if you’d prefer a lined bag, be sure to read my post on How to Line a Crochet Bag.
I love seeing your finished projects! If you enjoyed making the Sweet Dahlia Granny Square Bag, I’d love to see yours on Instagram, be sure to tag me @crochet365knittoo. If you are on Facebook, stop over to the Crochet 365 Knit Too Facebook page or pop over to the Crochet365KnitToo Club and share a photo! I’d love to see your work!
